Schema-based multitenancy with NestJS, TypeORM and PostgresSQL
A classic challenge when laying foundations for B2B SaaS is striking a balance between app security and dev productivity. A major security concern is data partitioning across accounts, or tenants: users from tenant A should not be able to access data from tenant B, and vice-versa.
What is multitenancy?
The straightforward way to ensure data partionioning is to flag all tenant-specific records in your DB with a tenantId key. Each incoming request that hits the DB must then be scoped against the current tenantId value. This strategy is commonly referred to as pooling strategy (all tenant records live in the same data pool). Although it feels intuitive, this strategy has a few issues:
- Scoping all requests increases their complexity and makes it harder to reason about your app, which hinders developer productivity.
- There is a risk that someday a developer will forget to scope one of the requests in upcoming developments.
- As the number of tenants increases, so does the number of rows in the DB tables (because they are shared by all tenants), and it becomes necessary to tune indexes to keep performance at an acceptable level.
- As all tenants data is pooled, it is tedious to extract / drop / restore data for a single tenant only, and you instead have to write custom scripts to hit only that target tenant across tables.
Enters multitenancy: multitenant apps partition DB records across tenants in such a way that cross-tenants access becomes impossible (whether it'd be caused by a hack or by a development mistake). Several approaches exist to achieve this:
- Physical partitioning: each tenant gets their own DB server. This is highly secure as they can each benefit from their own access credentials and network access protection, but this introduces significant infra overhead.
- Instance-based partitioning, a.k.a. silo strategy: in this setup, all tenants share the same DB server, but each tenant gets their own DB instance. This is a bit less cumbersome than the above, but you still have to provision a full DB instance for each tenant. And of course this also comes with pricing concerns if you're using managed DB services.
- Schema-based partitioning, a.k.a. bridge strategy: in this setup, all tenants share the same DB instance, but each tenant gets their own schema. Schemas are the same for all tenants (same tables and constraints definitions for all), but they remain isolated from each other. This means that once you establish a connection to a tenant schema, all subsequent requests will be tenant-scoped by default, thereby increasing developer productivity and security. This option is the one we'll explore here because of how it nicely balances the constraints at hand, being pragmatic while also secure.
Note that some will also refer to the tenantId field approach as being multitenants too. There is no hard definition of multitenancy, but it is generally understood that multitenants apps put a strong focus on strict data isolation across accounts. This is for example not the case for B2C apps where all users share the same vision of the world (e.g., all Twitter users see all tweets). B2B apps however most often are multitenanted in their approach given their business-sensitive content.
Before we dive-in further into schema-based partitioning, be aware that this strategy that has limitations, especially at scale (e.g., have to run 1 migration / tenant). In fact, Heroku even used to recommend against it (warning now taken out it seems) and a formerly popular Rails gem for this strategy is no longer maintained. It is a strategy that makes sense if you have few high-value tenants using your B2B SaaS. Otherwise, you might be best using the pooling strategy augmented with Row Security Policies, which is a relatively recent addition to PostgreSQL (added in 9.5). Although it takes an initial setup cost and adds a layer of complexity in entities and repositories, it provides a mechanism to ensure partitioning in a systematic way. Here is an excellent article to implement RLS in NestJS.
You should also go through this AWS article on the topic and extend your research to other sources too. That being said, the following snippets provide interesting perspectives on NestJS even if you decide not to go with this approach. Now, to the code!
Sample application
For this guide, we'll use a very simple app that is based on the sql-typeorm sample NestJS app. We have just renamed the users model to tenants model instead. Click here to get the full Github repository for the sample application we'll walk through.
Our app lets tenants manage their owns cats in a fully isolated fashion 😻. Note that there isn't any users-based logic in the app nor any authentication / authorization concerns, in order to focus on multitenancy. In a real-world app, each tenant would for example be a team that has many users linked to it, with related auth patterns.
The 3 cores requests that can be made are:
POSTa new tenant (thereby creating an "account", and generating a new schema for that tenant)POSTa new cat for a tenantGETa list of all cats for a given tenant
The data model is very simple:
- Each tenant has a
nameandid - Each cat has a
nameandid
Tenants are located in the public schema, which is the one shared by all tenants and which is not scoped to any tenant in particular. Requests hitting this schema don't need a tenantId. Cats are located in tenanted schemas, meaning they can only be accessed when specifying a tenantId in the request.
Note that the below schema uses integer IDs for simplicity, whereas in the actual app we use UUIDs (besides being best-practice in general, this also helps avoiding ID collision across tenants).
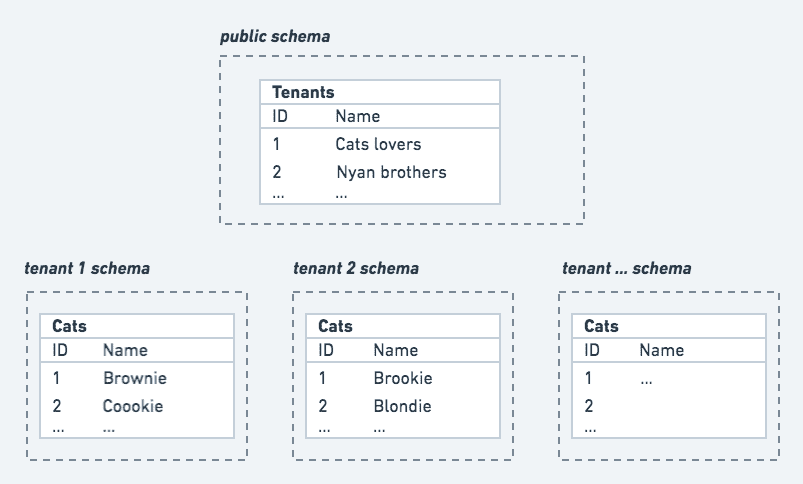 The data model of our simple application
Implementing multi-tenancy in NestJS
Setting up the groundwork
Below is the layout of the repo files. The core of the app is located within the modules folder.
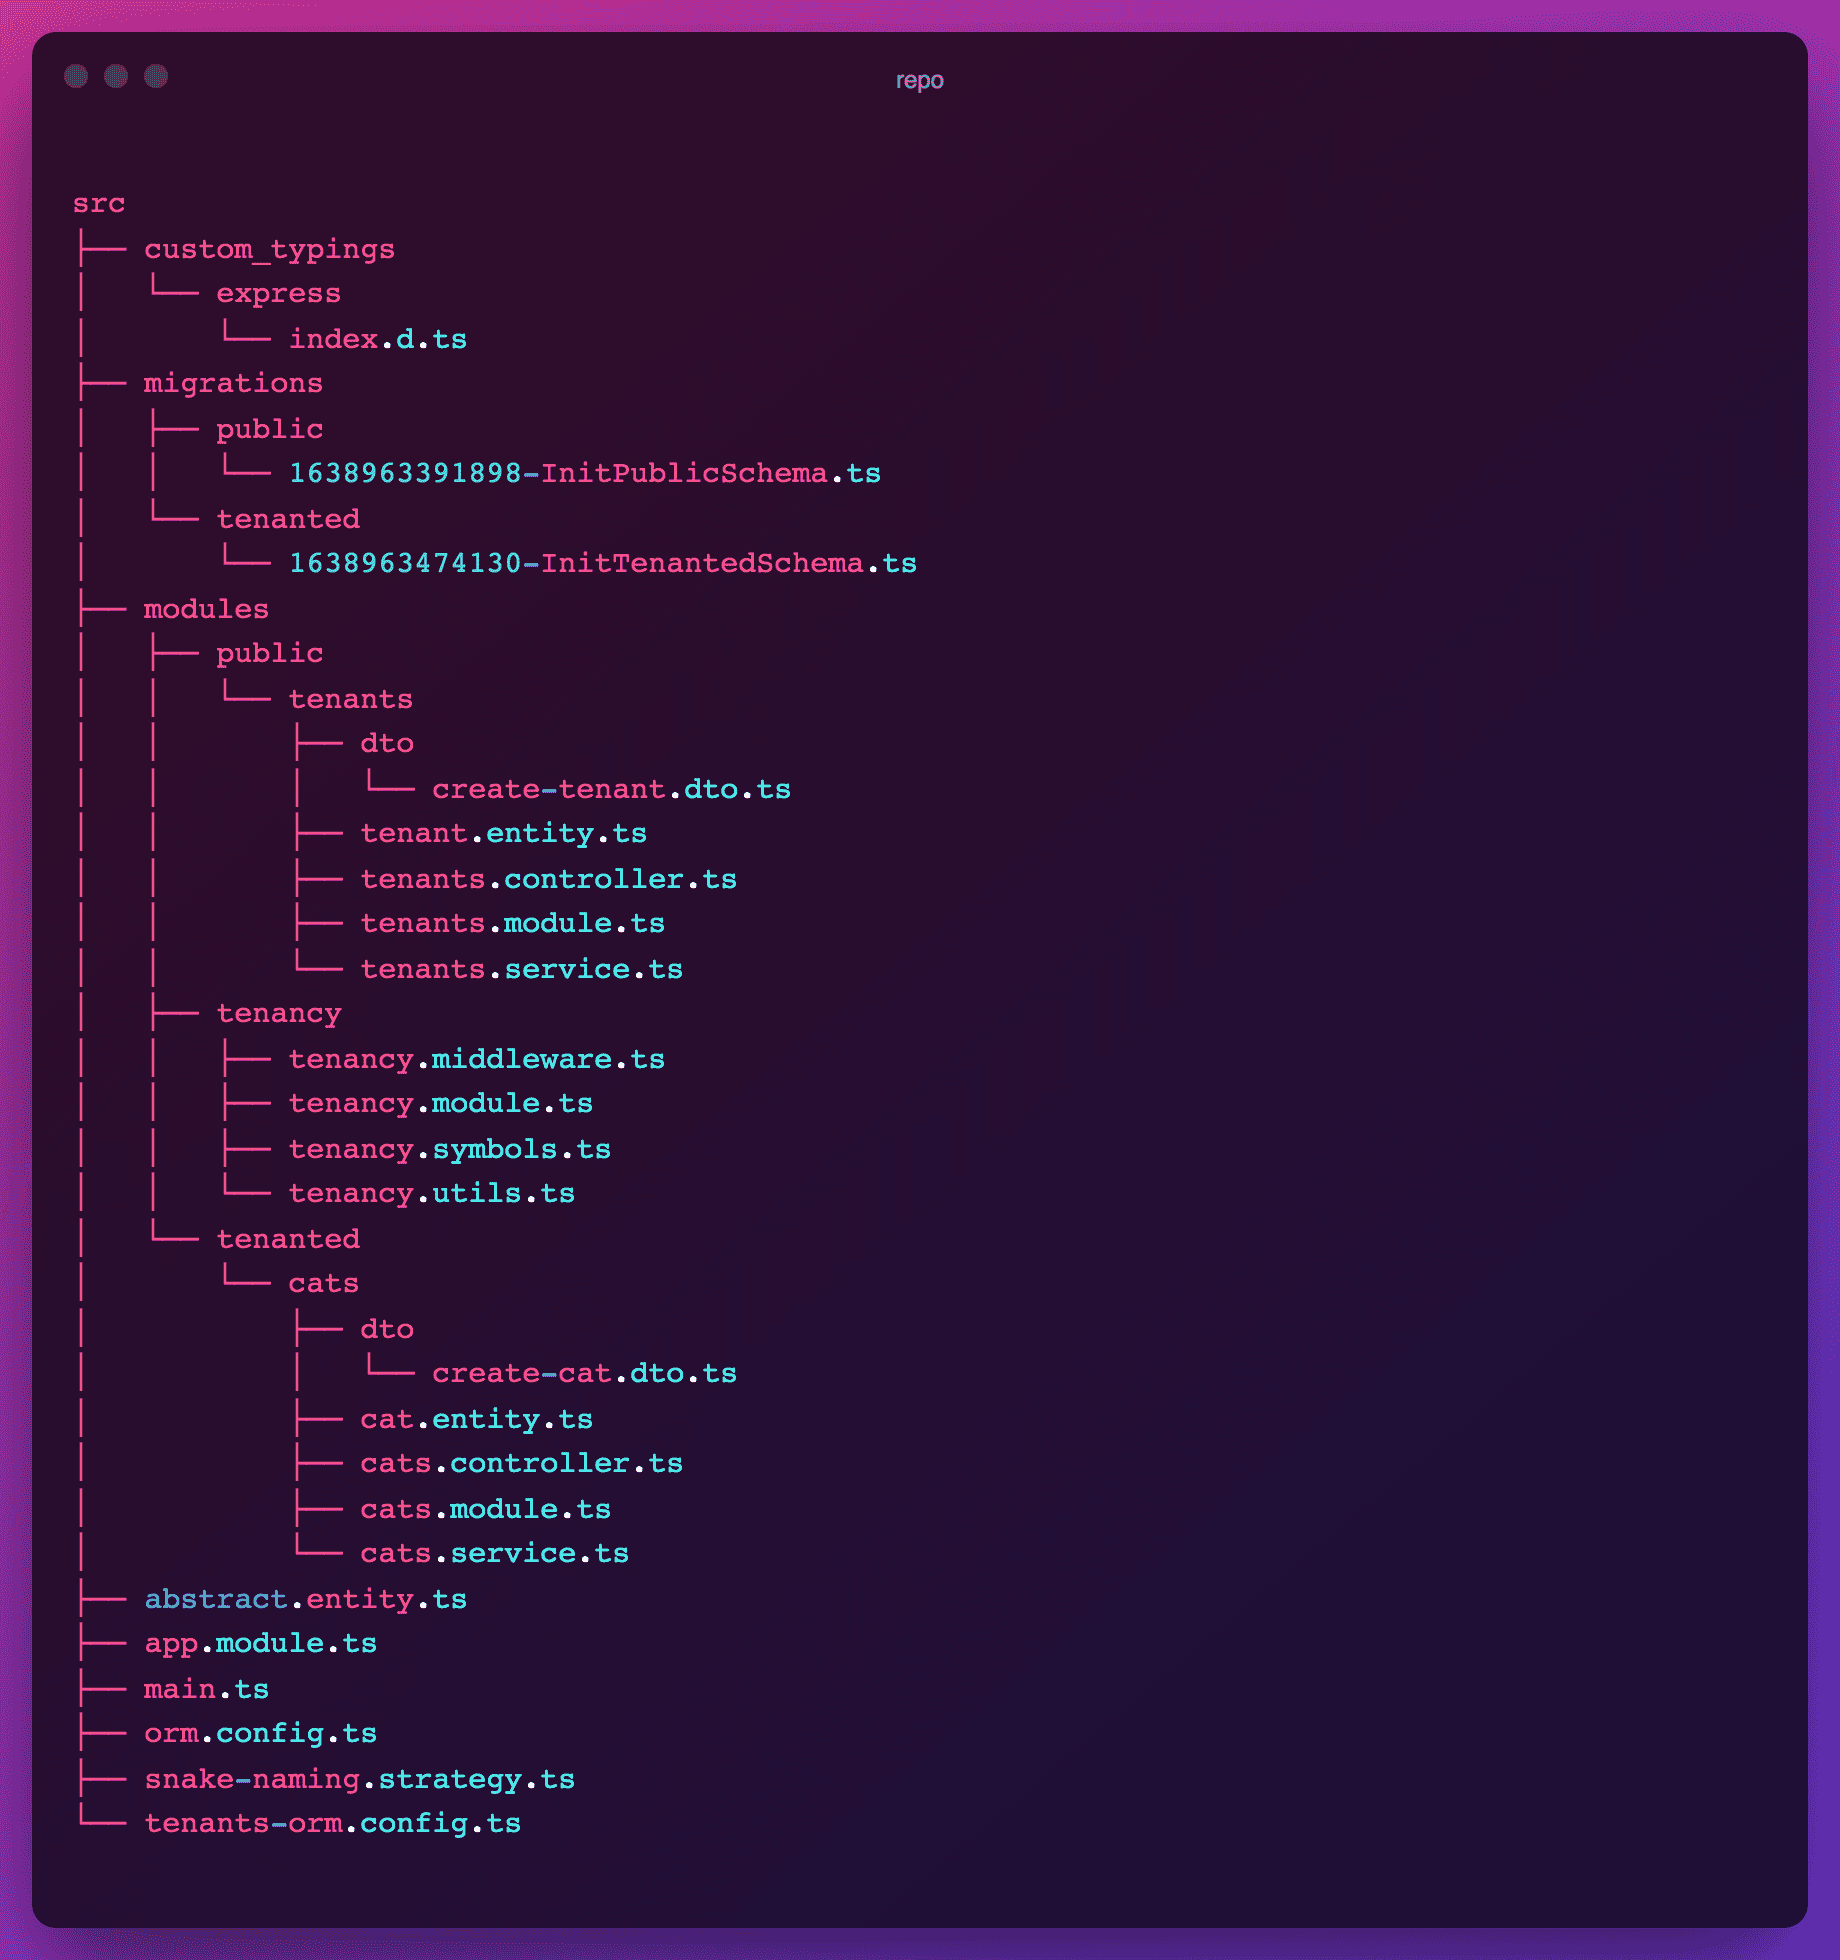
The functional modules have been namespaced along public and tenanted modules for clarity. The tenancy module lies in between, as it is packed with helpers and providers that will enable the multitenant setup.
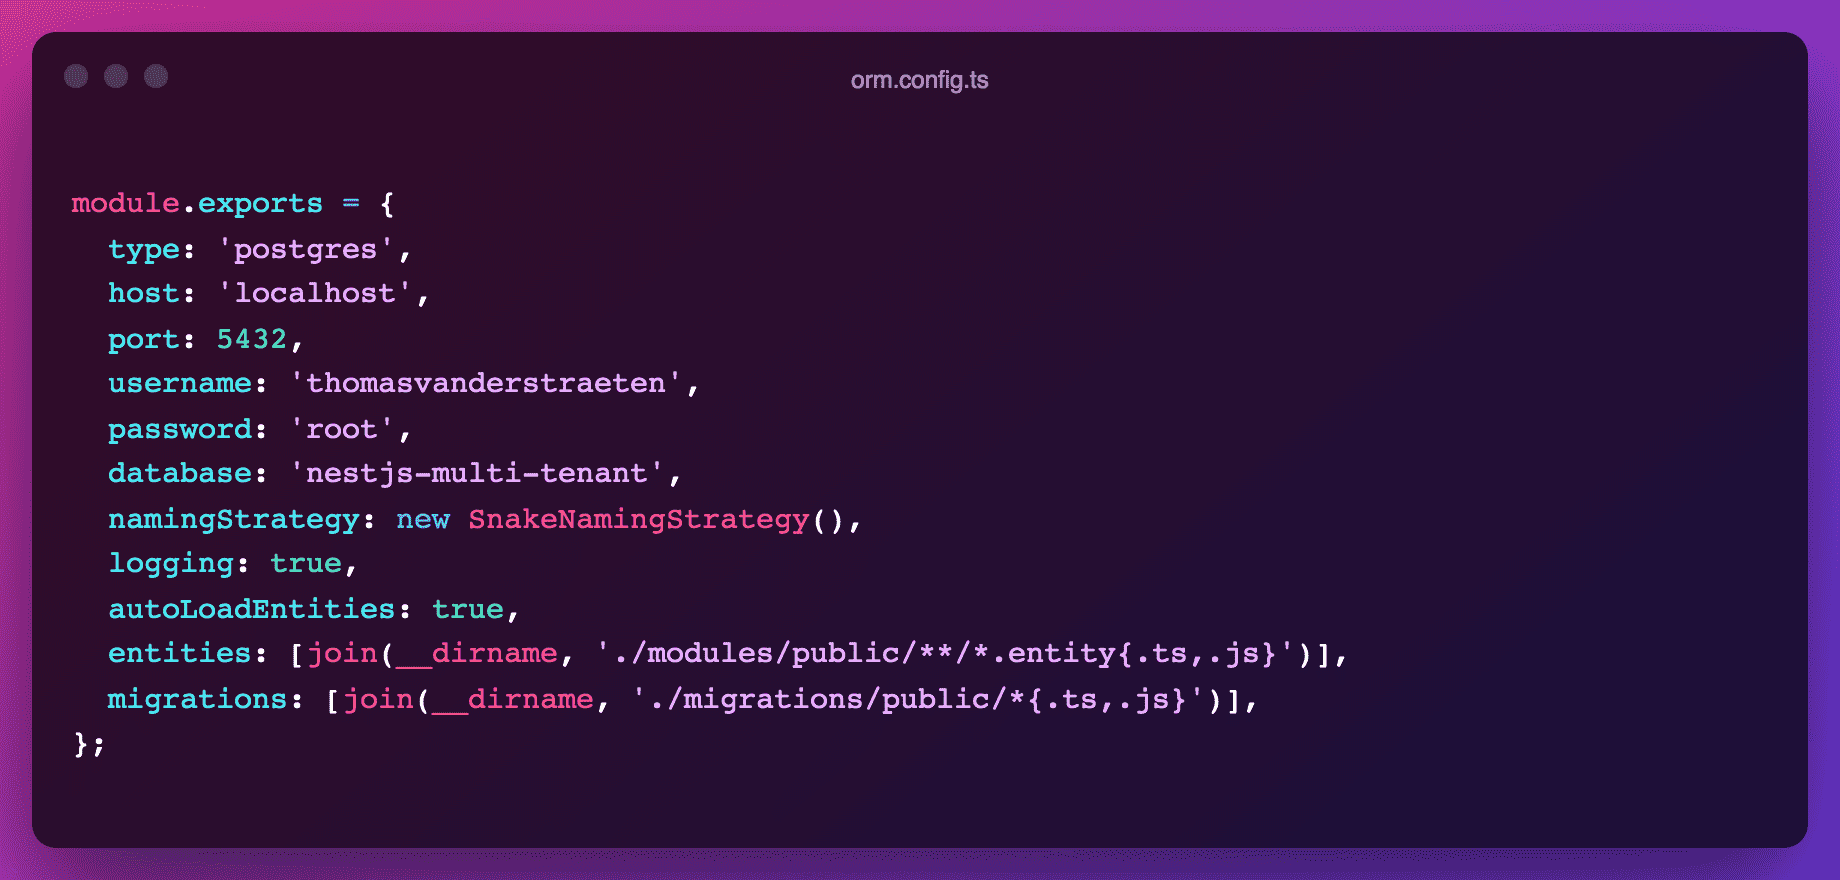
Since our public and tenanted entities and migrations are located in different paths, we must set up their TypeORM configuration accordingly. The public entities settings are quite standard:
While the tenanted configuration is just a variation of it, making sure we use the rightly namespaced entities.
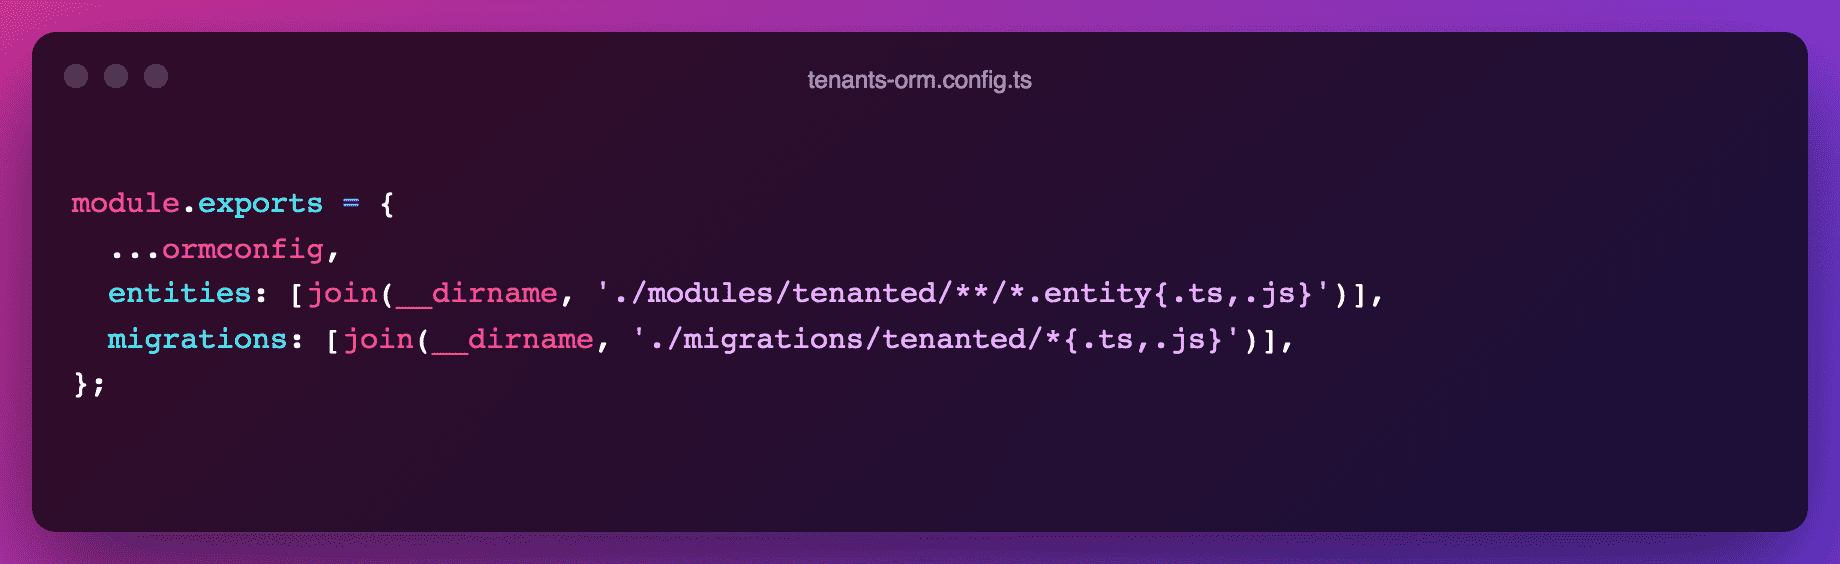
The public ORM config is used in app.module.ts in a standard way, while the tenanted config will be used later when we setup tenant-specific DB connections.
Note that the ORM config doesn't use ENV variables in this case for brevity, but you should of course extract Postgres config to dedicated environment-specific files.
Creating new tenants
Now that we've setup TypeORM accordingly, we can start creating tenants. Besides creating an actual tenant record in the DB, we must do the following:
- Create a new schema in the DB for the tenant
- Open a connection to this schema (more on that later in "Setting up a tenant connection")
- Run the migrations on this schema
- Close the connection (because we don't need it further in this request)

Note that we've chosen to name schema with the pattern tenant_${tenantId}. You may want to go with other patterns but it is best no to use user-provided value for this (for example, if your tenants are teams with names and slugs of these names, it might be tempting to use slugs but could lead to uniqueness conflicts and inconsistencies if names are changed later).
Handling requests
After a tenant has been created, we can start handling requests for it. This is the core of what there is to understand about schema-based multitenancy in NestJS.
Sending the tenant ID in requests
We have to define a way for incoming requests to specify their target tenant. Stepping back a bit from our current application, there are many patterns to do so:
- Don't refer the tenant explicitly but use a user id instead passed in the auth token. This works in setups where one user can have one team only, because each user id can then be mapped directely to its tenant id. This doesn't work when one user can be part of different teams (think of Slack for example).
- Specify the tenant in the API host (e.g., myteam.pipedrive.com, myotherteam.pipedrive.com). It's interesting because it explicitly informs the user about the tenant at hand, but it leads to complexity related to uniqueness and consistency as stated above. It also requires some more devops setup so your API server can handle wildcard subdomains.
- Specify the tenant in the body of the request.
- Specify the tenant in the headers of the request.
For our application, we use an x-tenant-id header property whenever a request targets tenant resources (cats in our case). This helps separate multitenancy concerns from the actual business logic of requests contained in the body.
Communicating the tenant ID to downstream consumers
Once the request hits the server, the tenant id has to be parsed, validated, and made accessible to the rest of the app. This is the role of the tenancy middleware, which checks incoming requests for presence of the x-tenant-id header and adds the tenantId attribute to Express requests. This will later be mounted with app.use(tenancyMiddleware) in the main.ts file.
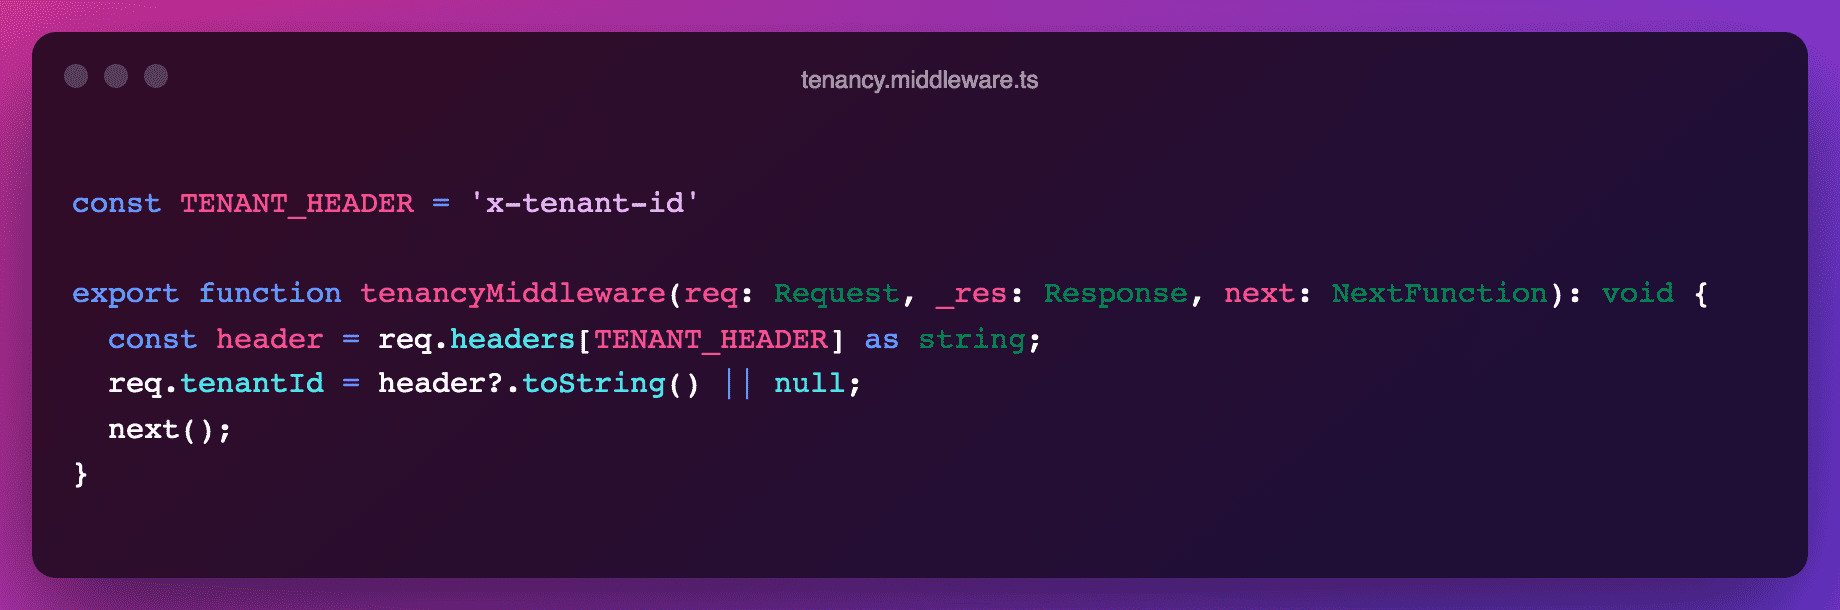
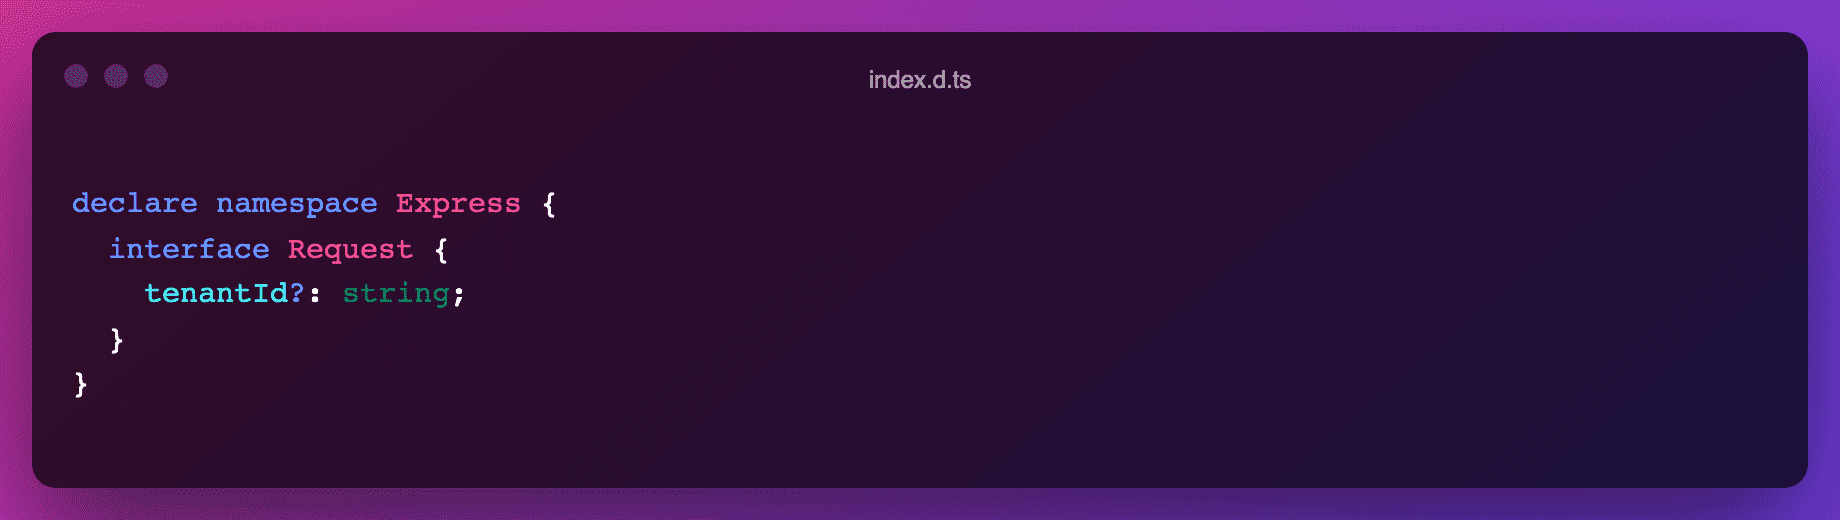
Note that adding the tenantId key to Express requests requires that we've extended their type definition first.
Scoping the queries
Once the tenantId has been set on the request, we can process the request in the target service (CatsService in our case). The key difference versus non-tenanted services is in the setup of the repositories:
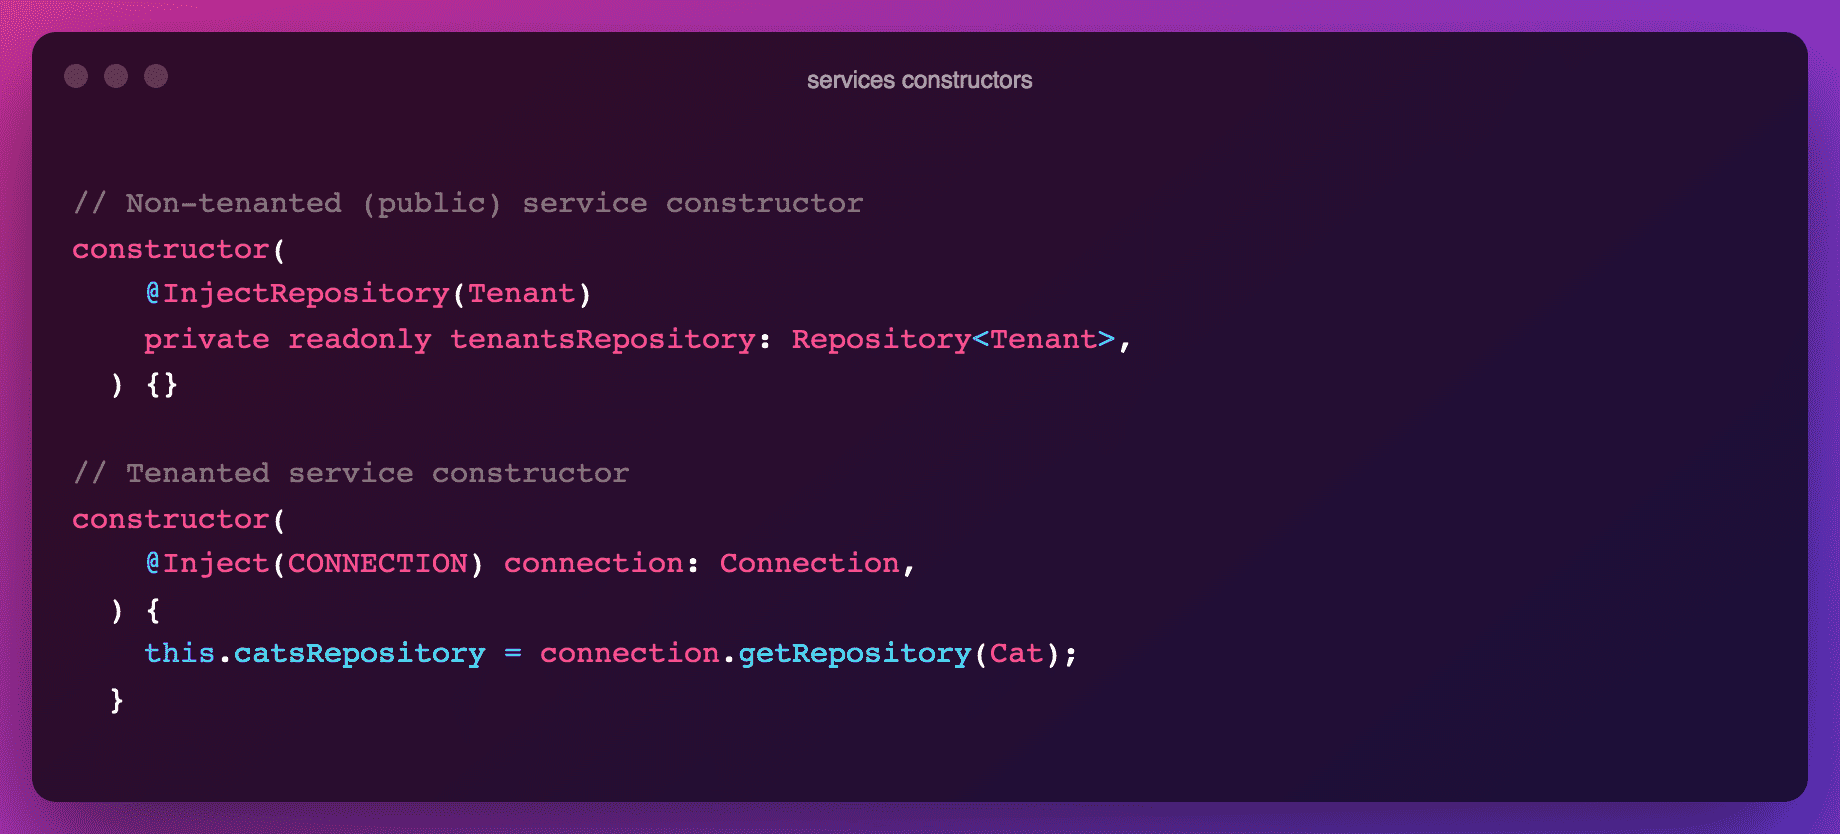
Whereas public schema services use simple dependency injection for setting up their repository, tenanted services instead have to import the tenanted connection first and then boot a repository on the correct schema. For the rest, all logic is similar to non-tenanted setups.

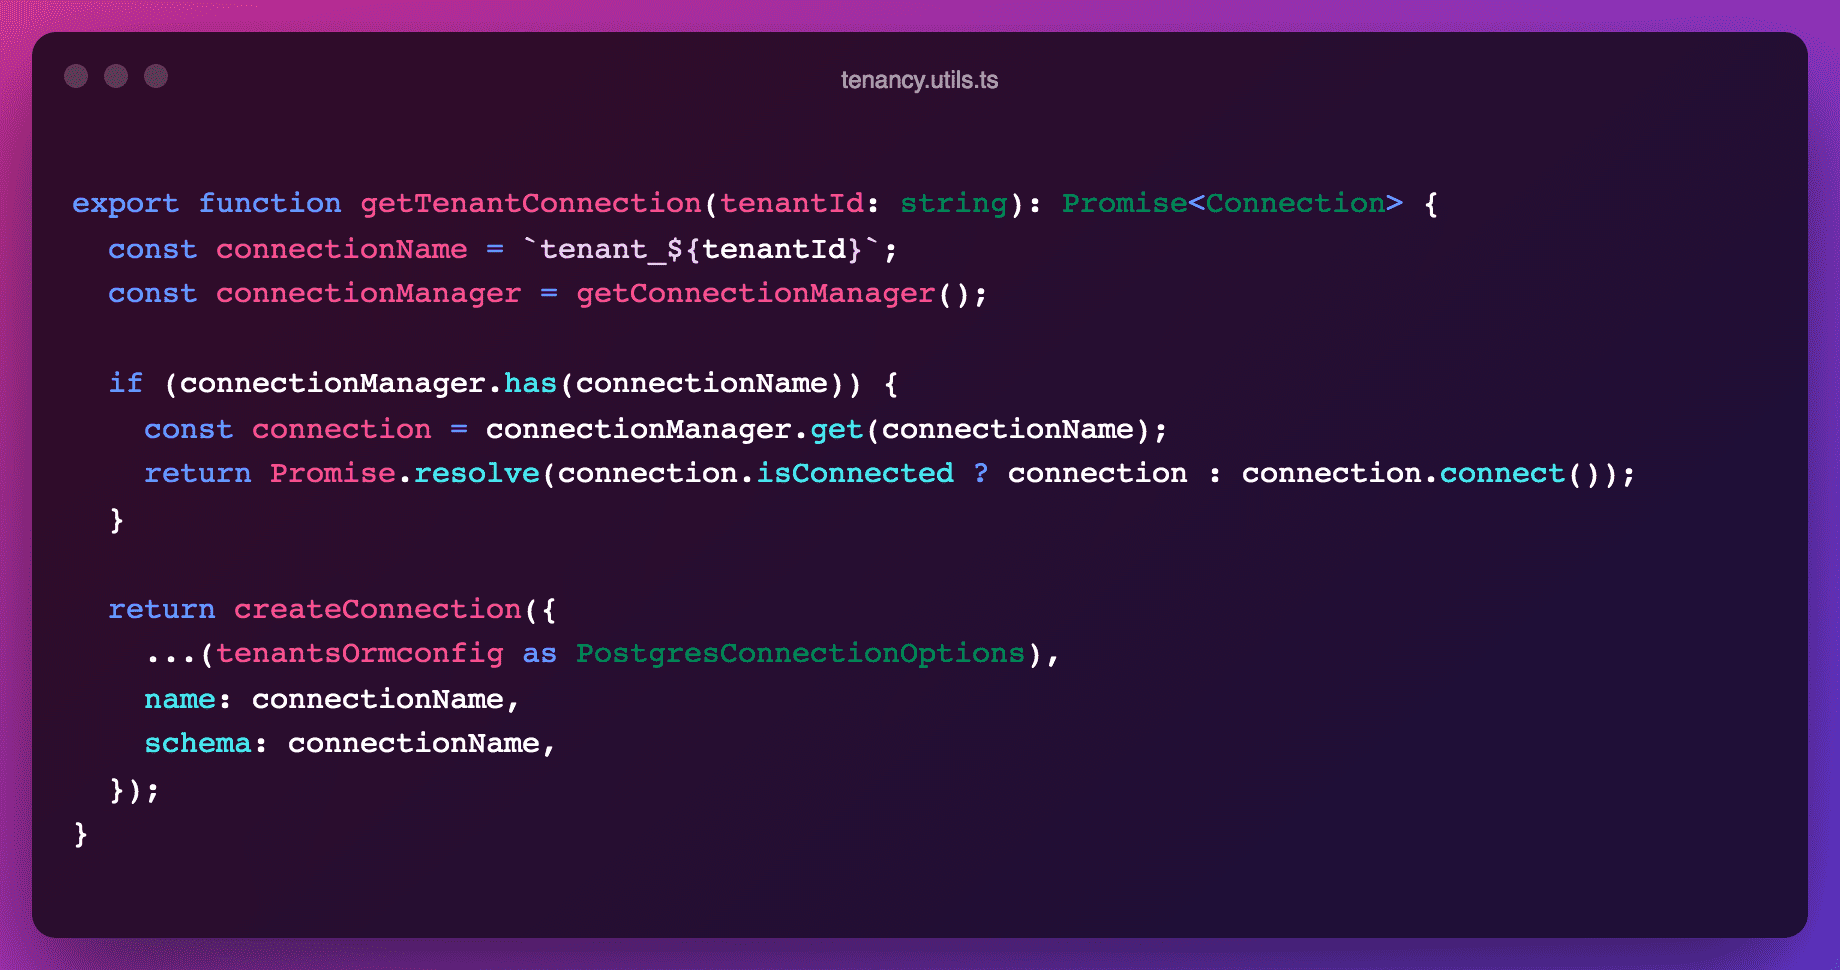
The CONNECTION is a provider created within a factory that consumes the tenantId set up by the middleware, and returns the connection if relevant. Note that this provider is scoped on REQUEST, which means that all downstream consumers of CONNECTION will also be request-scoped by default. This has unfortunate performance implications (e.g., CatsService has to be destroyed and recreated for each request, whereas TenantsService can be reused across requests), but it is required so that no mess-up occurs across tenants. A way around this is to remove repository setup from the constructor and perform it at the start of each function (much more verbose).
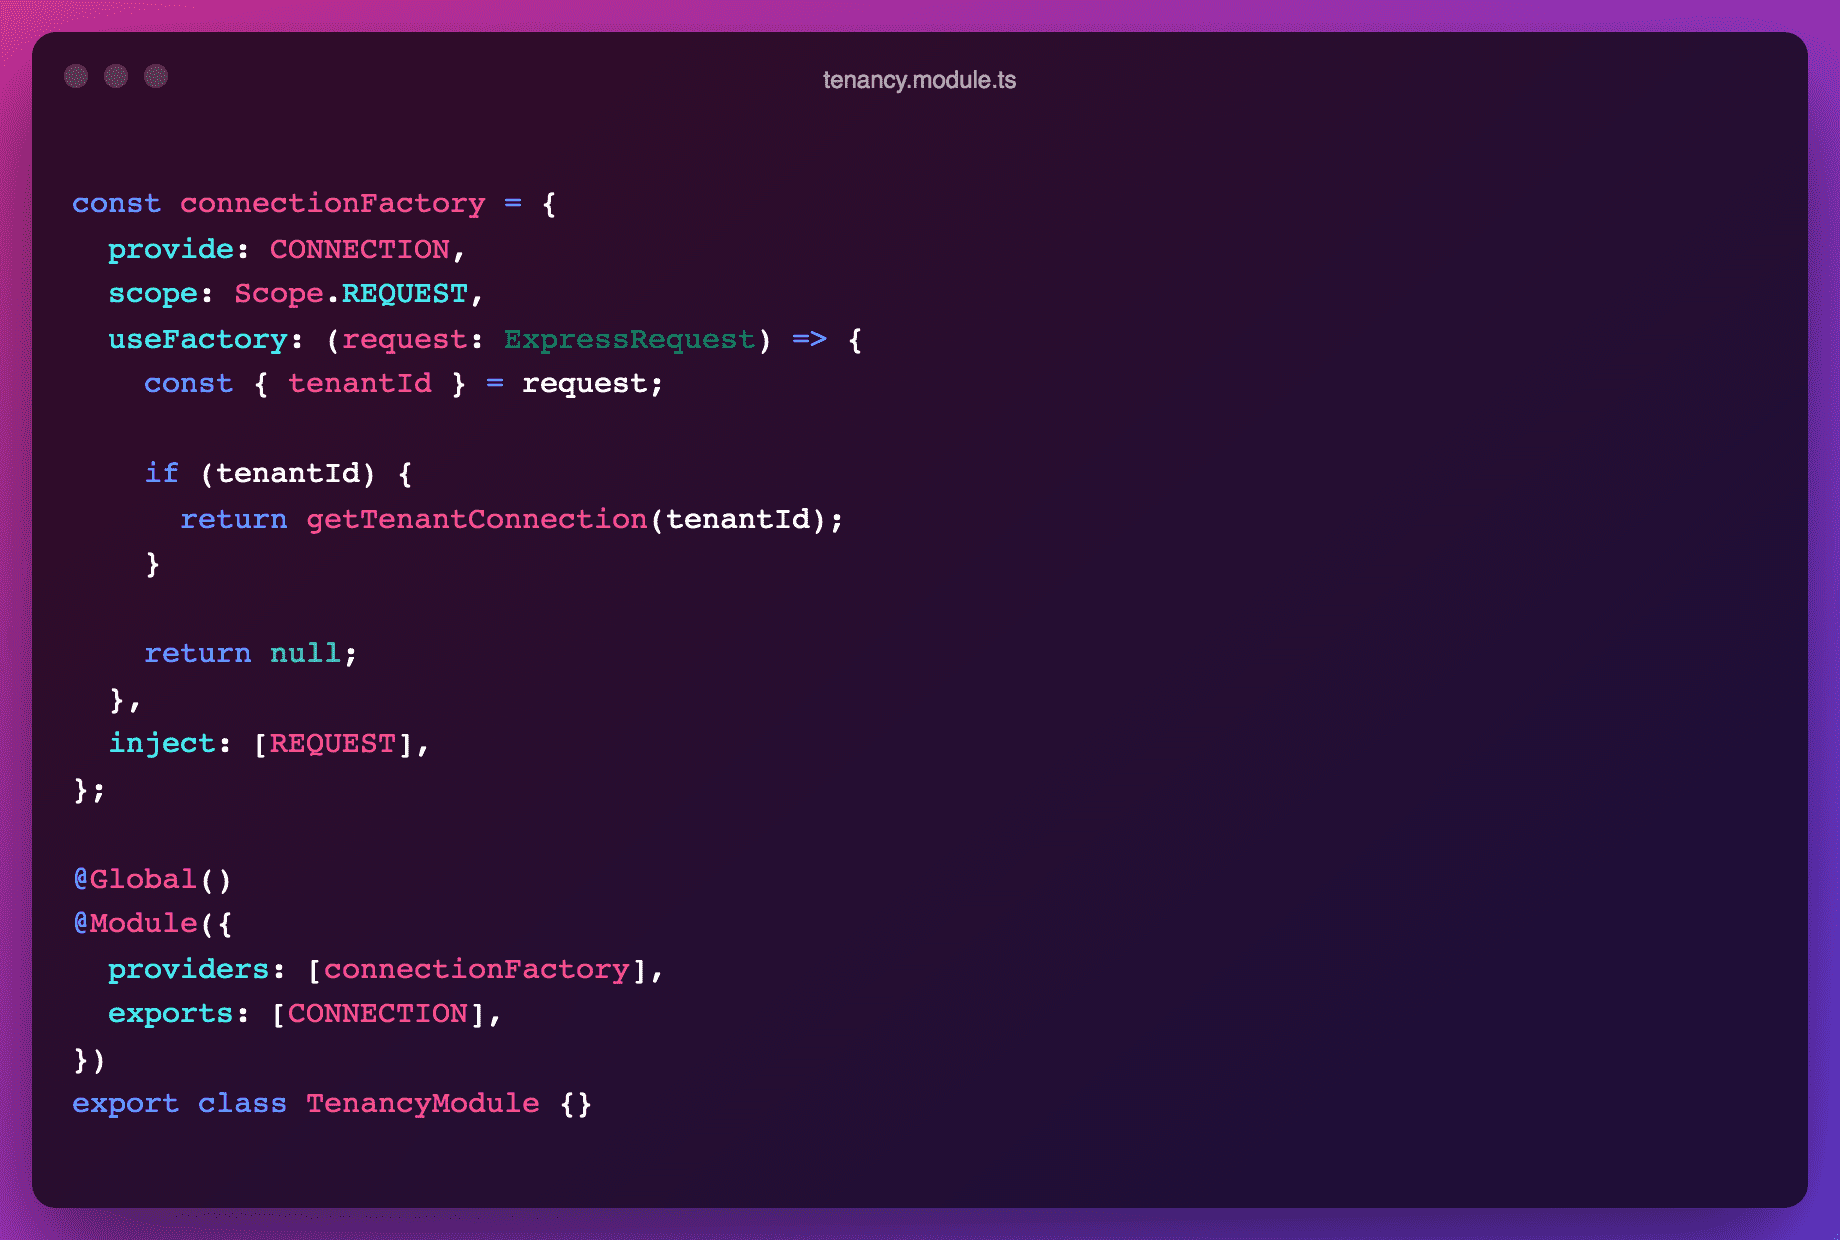
The connection itself is either retrieved from the existing connections pool or created on the fly.
Handling tenant-scoped jobs
Apps don't always only process HTTP requests from consumers. They can also execute CRON jobs for example. One way to handle this is to extend the CONNECTION provider so that it detects whether current execution is coming from an HTTP request or from a Bull job. Jobs then have to be tagged with their tenant id as metadata to ensure scoped processing at execution time.
Migrations
A last interesting complexity arises from the operation of migrating tenanted schemas.
Creating public migrations
Migrations on the public schema strictly follow the standard TypeORM ways of working, nothing peculiar about them. We just make sure to namespace the corresponding files in the public folder.
Creating tenants migrations
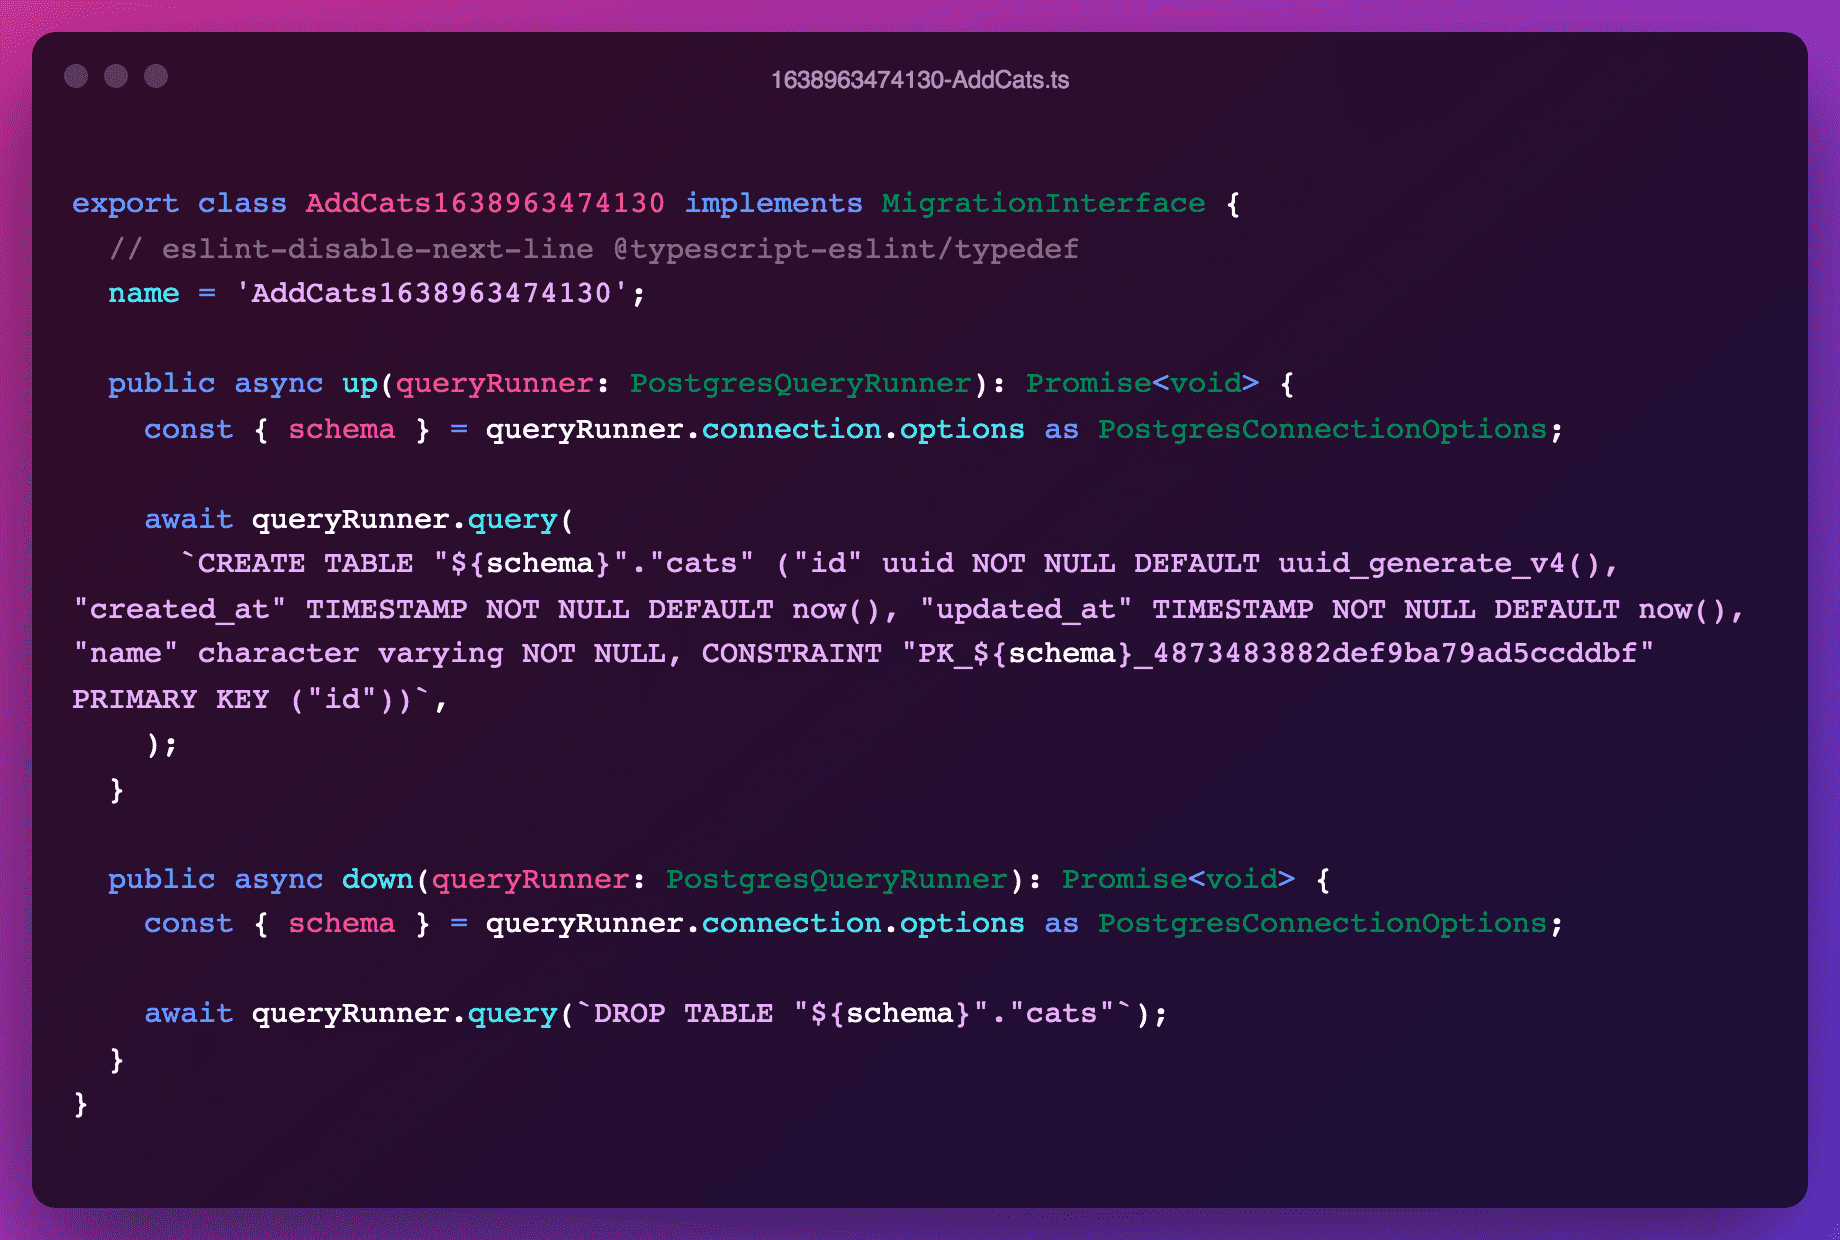
Tenanted migrations are another story 😅. It's been a while since I stopped TypeORM to generate correct migrations for new entities or entities updates, often getting weird auto-generated stuff. I'm rather in the habit of writing migrations entirely by hand, which also gives extra confidence before updating the DB.
Tenanted migrations require 2 core modifications:
- All tables must be prefixed with their schema name (e.g.
"tenant_${tenantId}"."cats"in our case). - Since constraints keys in PostgreSQL are shared across all schemas, we must make sure to label each key uniquely, doing so with the current schema name.
Running migrations
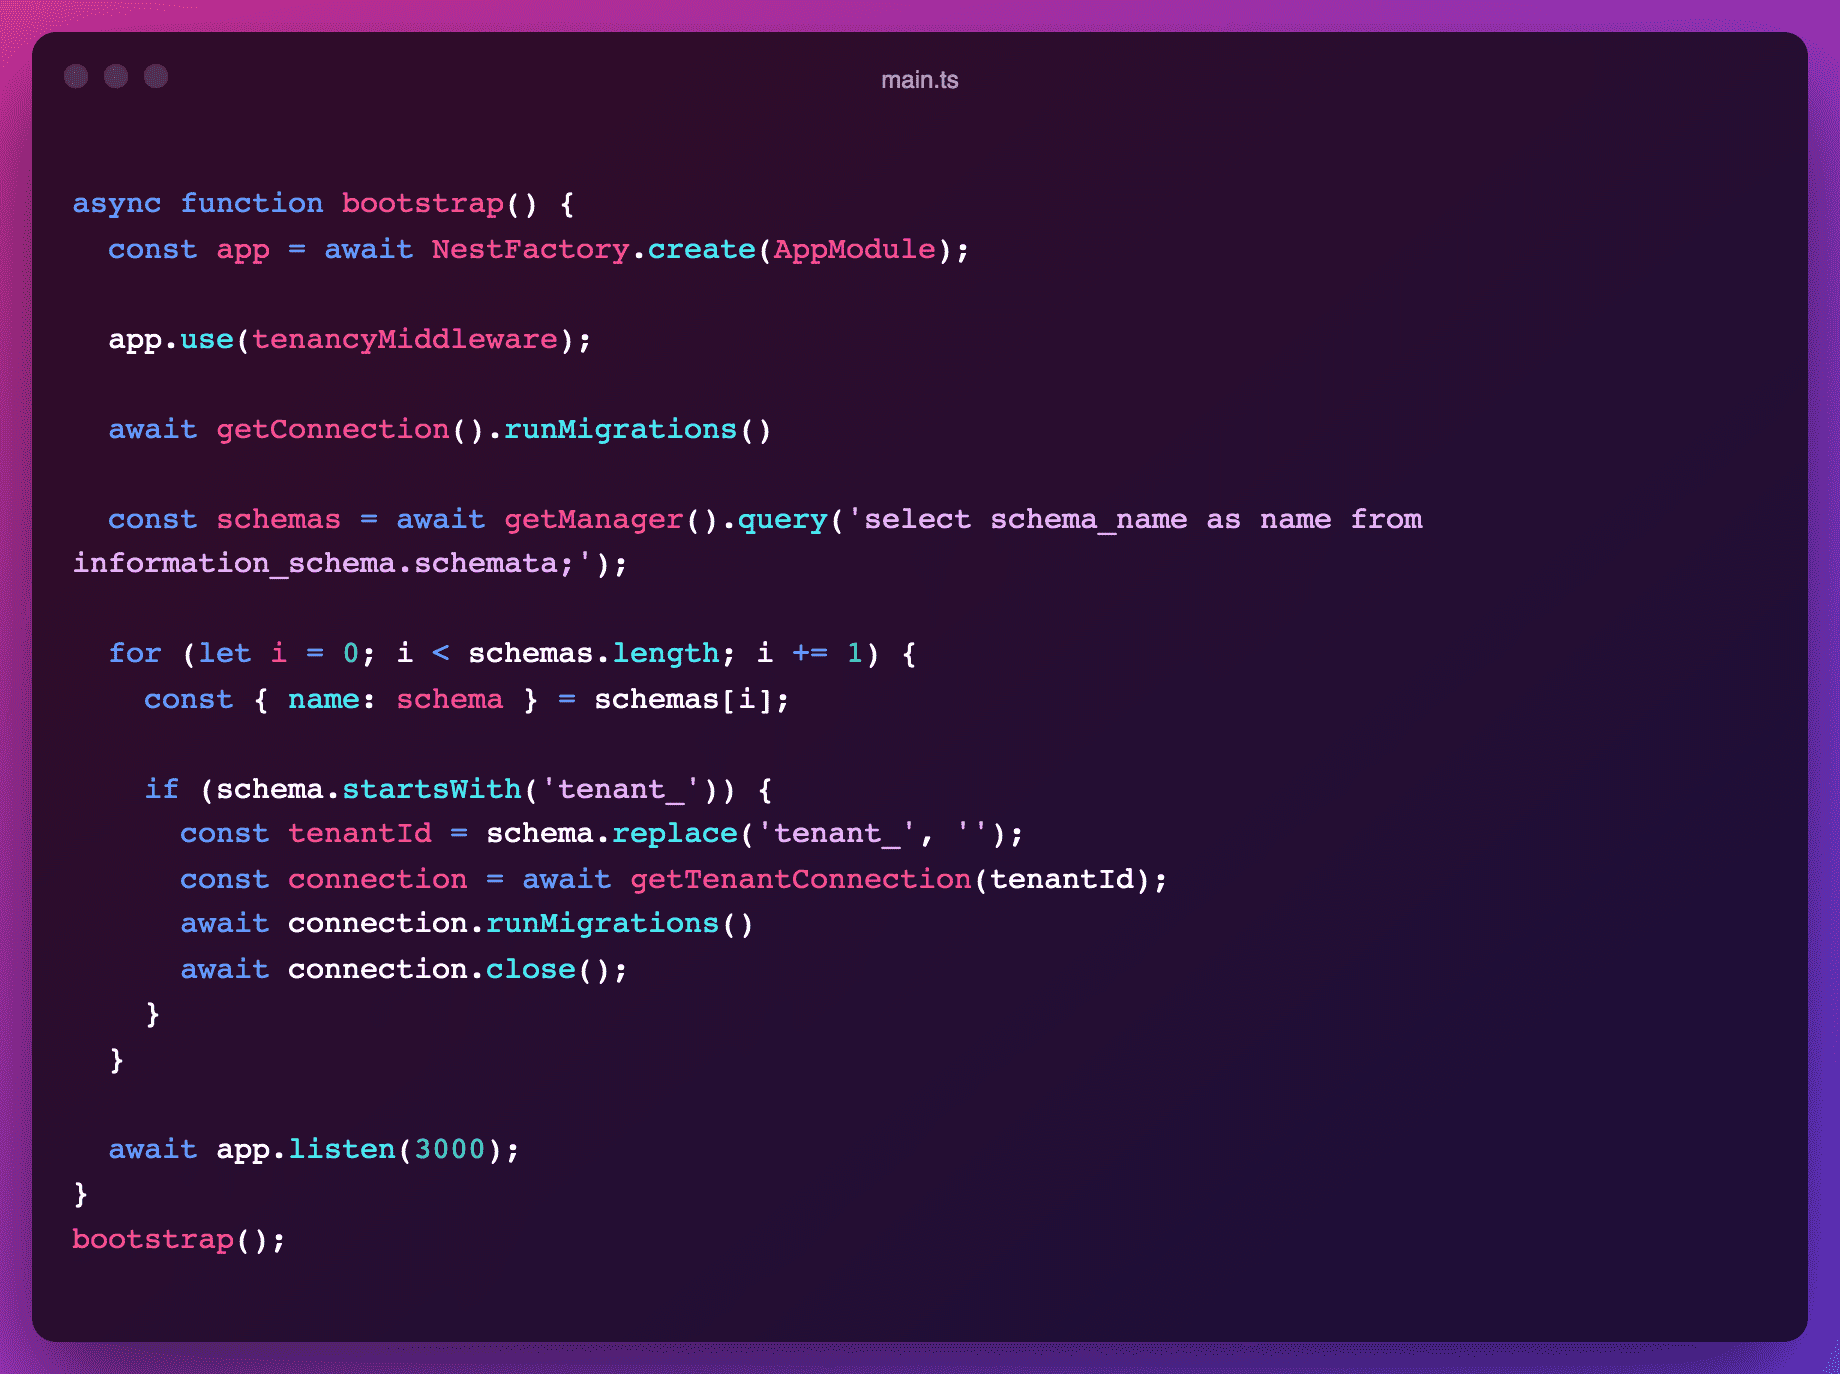
Migrations are run just the same for both public and tenanted migrations. When we boot the app, we open both the connection to the public and tenanted schemas to run all migrations.
Security
Besides the structural schema-based isolation, other steps can be taken to improve security in our app.
Preventing access to wrong tenant
When crafting a B2B SaaS, ones typically handle a concept of "teams" (tenants) which have each their "users". Hence, before establishing a connection to a schema for an incoming request, it is necessary to validate that the user making the request is indeed part of the team they are trying to access. This logic should typically be handled within a NestJS guard. It has been omitted from our sample app for the sake of brevity.
Hardening schema access
Currently, the partitioning of schemas for incoming requests is performed at application level. Note however that if your app is vulnerable to SQL injection, it is possible to craft a request that will query other schemas even from the current schema. To avoid this altogether, it is advisable to enforce partitioning also at DB level. One way to do this is to extend the tenanted TypeORM config to create and use one Postgres user per tenant, with access to the related schema only. Nevermind if they all share the same password; the important is that they simply can't access other schemas. I personally haven't tried this approach, but have seen paths to implementing it.
Testing
Finally, when it comes to testing a schema-based multitenant NestJS app, there is some overhead required too. The sample application does not include tests, but be aware of the following:
- It is best to test you app end-to-end with a real test Postgres DB instead of a mock, because of the DB-level logic involved
- Before each test that targets tenanted resources, it is necessary to create a tenant to setup the supporting schema
- Don't forget to tear down the schemas when you're done testing
Closing thoughts & readings
I have used this schema-based multitenants strategy for NestJS during 2 years during with years at Canyon Legal. We originally chose to go with this approach as I was coming from the Rails world where this was still the go-to strategy by then. It also made sense given the high value and sensitivity of our users accounts. Overall it has served us well and gave us a golden opportunity to dive deep into the inner workings of NestJS and TypeORM.
That being said, I do not think that I would use this approach again for future projects. I would instead try out the row-level security policies of Postgres. Also, I'm worried about the state of TypeORM as a project (we contributed to their OpenCollective when using it), as it lacks a clear roadmap and has a significant issues backlog. For my next projects, I would first look at Prisma instead. From my superficial initial research, it felt like implementing schema-based multitenancy in Prisma would be a complicated venture.
Thanks for reading. I hope you can also find the tradeoff between security and developer productivity that suits your project best!